
Picture this: your internet is slow. You immediately blame your Internet Service Provider (ISP), but what if it’s not them? Open Wireshark, start capturing traffic for 30 seconds, then check Statistics → Conversations. Within moments, you’ll spot the exact culprit eating your bandwidth. Maybe it’s your roommate streaming 4K Netflix in the other room. Or that app you installed last week quietly uploading gigabytes of data somewhere. Sometimes it’s just Windows Update deciding 3 PM is the perfect time to download 5GB worth of updates.
That’s the power of Wireshark – it gives you visibility into what’s really happening on your network. But here’s where it gets tricky. Wireshark captures everything, literally everything. Thousands of packets flow through every second. Without the right filters, you’re essentially staring at a flood of data with no way to make sense of it. You’re looking for that one important packet in an ocean of noise.
That’s where filters come in. They let you cut through all that garbage and focus on exactly what you need to see. So, let’s dive straight in understanding these filters.
Before you can analyze anything meaningful, you need to isolate traffic from specific devices. That’s where ip.addr == 192.168.0.1 becomes your first tool.
1st Filter: ip.addr == 192.168.0.1
What it does: Shows every packet going to or coming from a specific IP address, cutting through thousands of irrelevant packets instantly.
When you use it: Let’s say you found a potentially compromised machine at 192.168.1.55 and need to see everything it’s communicating with. Filter by that IP and you’ve isolated all its traffic – every connection it makes, every server it contacts, every byte it sends or receives. Or maybe you’re testing your own application and need to see only packets between your dev machine and the test server. Plug in the server’s IP, watch the communication flow, and debug connection issues without scrolling through noise from other devices on the network.
Once you can track devices, the next step is finding what they’re sending in cleartext.
2nd Filter: tcp.port == 80
What it does: Catches all HTTP traffic – websites not using HTTPS.
When you use it: In cybersecurity, HTTP traffic means potential data leaks: credentials, session tokens, API keys sent without encryption. This becomes critical during penetration testing or security assessments. Any web application still using port 80 for sensitive operations is a major finding. You’ll see full HTTP requests including headers, cookies, and form data. It’s perfect for understanding how web protocols actually work before you tackle encrypted HTTPS analysis. When you’re learning man-in-the-middle attacks, HTTP traffic is where you practice before moving to more complex SSL stripping.
The next filter takes this further by showing all HTTP traffic regardless of port.
3rd Filter: http
What it does: Shows all HTTP traffic – requests, responses, cookies, form submissions, everything unencrypted.
When you use it: Watch raw GET and POST requests flow past. Examine headers. Find authentication tokens in cookies. This is how you understand session hijacking beyond theory – grab someone’s session cookie from HTTP traffic and you can impersonate them. Or use it while testing your own web app to see what data you’re actually sending. Found credentials in a POST request? Your app has a security problem. Every cybersecurity course covers HTTP analysis, but this filter is how you actually do it in practice. You’ll use this constantly when practicing with intentionally vulnerable apps like DVWA or WebGoat.
Now that you understand basic traffic flow, look at DNS – the protocol that translates domain names to IP addresses.
4th Filter: udp.port == 53
What it does: Shows DNS queries – every time a device asks “what’s the IP address for this domain?”
When you use it: This matters because malware loves DNS. It’s rarely blocked, making it perfect for command-and-control communications and data exfiltration. Filter DNS traffic and look for suspicious domain queries – long random strings, unusual TLDs, or high-frequency queries to the same domain. Or maybe you’re troubleshooting your web scraper that keeps failing. Check if DNS queries are timing out or if you’re hitting DNS rate limits. You’ll see the actual domains being queried and whether responses are coming back. Critical for threat hunting – DNS is a goldmine for finding compromised systems before they do real damage.
But udp.port == 53 only shows UDP traffic. The more comprehensive approach uses the next filter.
5th Filter: dns
What it does: Shows all DNS traffic regardless of port or protocol (catches both TCP and UDP).
When you use it: Some DNS uses TCP instead of UDP, especially for large responses. DNS tunneling – a data exfiltration technique – often uses non-standard configurations. This filter catches everything. When you’re analyzing a malware sample in your sandbox, watch DNS queries to see what domains it’s trying to reach. Building a threat intelligence feed? DNS data shows you command-and-control infrastructure. Investigating a phishing campaign? See what domains the malicious links resolve to. More comprehensive than just filtering UDP 53 – you’ll catch DNS over TCP and DNS tunneling attempts.
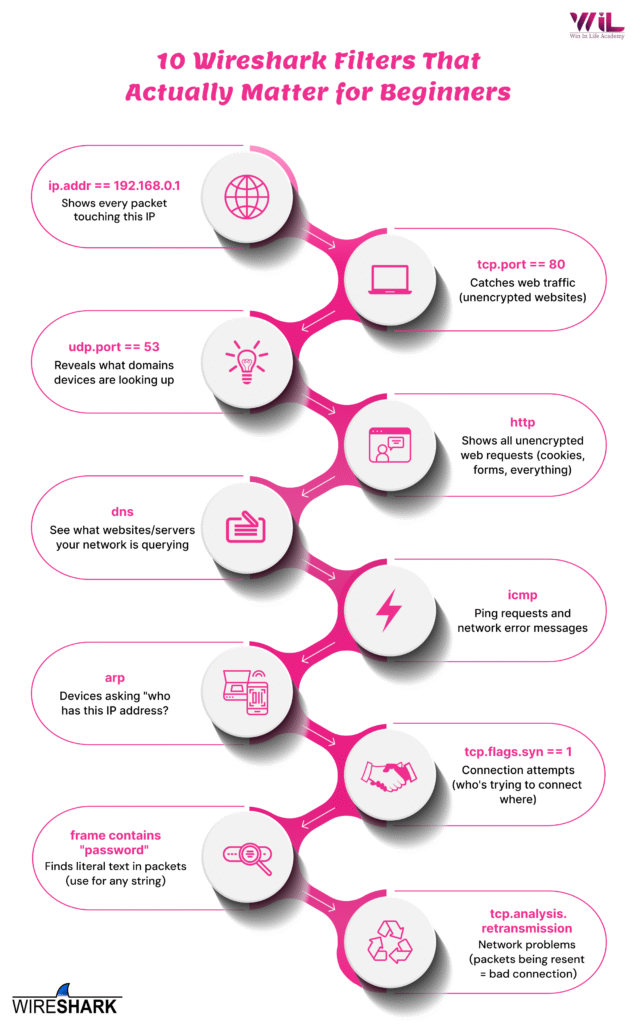
Moving down the network stack, the next filter is essential for troubleshooting and detecting reconnaissance.
6th Filter: icmp
What it does: Shows ping requests, replies, and error messages from the network.
When you use it: ICMP is used for diagnostics but also in reconnaissance when attackers ping sweep networks to find live hosts. See a flood of ICMP requests to sequential IPs? That’s a network scan in progress. See ICMP “Destination Unreachable” messages? Your firewall rules are blocking traffic, which is good for testing firewall configurations. No ICMP replies from a target during a pentest? The host might be down, or ICMP might be filtered. Understanding ICMP is essential for recognizing network layer attacks – ICMP floods, ping of death, smurf attacks. You need to distinguish normal network diagnostics from malicious ICMP traffic.
Even lower in the stack is ARP, the protocol devices use to find each other on the local network.
7th Filter: arp
What it does: Shows ARP requests – devices asking “who has this IP address?” to find each other on the local network.
When you use it: This becomes critical for detecting ARP spoofing attacks or mapping network topology. ARP is a Layer 2 protocol that’s completely unauthenticated, making it trivial to exploit and critical to understand for network security. When you see duplicate ARP replies for the same IP from different MAC addresses, that’s ARP spoofing – someone’s intercepting traffic. Use this when practicing man-in-the-middle attacks with tools like arpspoof or Ettercap. You need to see the poisoned ARP packets to understand what’s actually happening. Also useful for finding rogue devices on your lab network or understanding how attackers do initial network reconnaissance.
Understanding TCP behavior is crucial for both security analysis and troubleshooting.
8th Filter: tcp.flags.syn == 1
What it does: Shows the first packet of every TCP connection attempt (the SYN flag).
When you use it: Every TCP connection starts with a SYN packet. See thousands of them in seconds? That’s a port scan from tools like nmap or masscan. Use this when you’re running the scan yourself to verify your tool is working correctly. Or use it defensively to detect when you’re being scanned. In SOC work, a spike in SYN packets to uncommon ports is a clear indicator of reconnaissance activity. Beyond security, this filter is critical for understanding the TCP three-way handshake beyond textbook diagrams – you’ll see the actual SYN, SYN-ACK, ACK sequence in real traffic.
But what happens when connections fail or perform poorly? That’s where the next filter comes in.
9th Filter: tcp.analysis.retransmission
What it does: Shows packets that had to be resent because they didn’t arrive the first time.
When you use it: High retransmission rates kill performance and cause weird behavior in security tools. Your reverse shell keeps dropping? Check for retransmissions – it might be network instability, not your payload. Your vulnerability scanner reports incomplete results? Retransmissions indicate the target network has congestion or packet loss. This is also critical for performance testing. If your application shows high retransmission rates under load, you’ve found a bottleneck. In incident response, unusual retransmission patterns can indicate network-based attacks like TCP reset attacks or connection hijacking attempts.
Finally, when you need to find something specific but don’t know exactly where it is in the network traffic, this filter becomes indispensable.
10th Filter: frame contains “password”
What it does: Searches the entire packet (headers and data) for any text string you specify.
When you use it: Want to hunt for sensitive data in cleartext? Search for “password”, “Authorization”, “Bearer”, “api_key”, or “token” to find authentication data being transmitted. Looking for database activity? Search for “SELECT”, “INSERT”, or “UPDATE” to find SQL queries that might indicate SQL injection attempts or database traffic. In CTF competitions, search for flag formats like “flag{” or “HTB{“. During reconnaissance, search for specific error messages, stack traces, or version numbers. Replace “password” with any string relevant to your investigation. This is your Swiss Army knife for packet analysis when you know what you’re looking for but not where it is.
Understanding tools like Wireshark becomes pretty important as you move forward in cybersecurity domain and knowing these 10 display filters becomes your starting point. Whether you’re interested in network security, threat detection, or incident response, being able to analyze network traffic is a skill that keeps coming up. These filters give you that foundation to build on.
If you’re looking for more structured learning and want to develop practical cybersecurity skills that employers value, check out Win In Life Academy’s Cyber Security Course. It’s built for students and working professionals who want comprehensive training beyond scattered online tutorials.