


If you’ve started learning cybersecurity, you’ve probably heard Nmap mentioned in every tutorial, course, and job description. There’s a reason: it’s the one tool that shows you what’s happening on a network, the open doors, the running services, the devices that shouldn’t be there. Whether you’re scanning a corporate network for vulnerabilities, conducting penetration tests, or investigating potential security breaches, Nmap is the foundational tool that every security professional, from SOC analysts to penetration testers, uses to understand what’s exposed and where the risks lie.
Here’s why you need this cheatsheet: Nmap has over 100 command options and combinations. Without a structured reference, you’ll waste hours searching for the right scan type, forget critical flags during assessments, or miss vulnerabilities because you didn’t know which command reveals them. A cheatsheet eliminates that friction; it’s your quick reference when you’re in the middle of a lab exercise, working on a capture-the-flag challenge, or conducting your first real vulnerability assessment and can’t afford to fumble through documentation.
We’re breaking down each command with clear explanations of what it does, when to use it, and what the results actually mean. No assumptions that you already know this stuff, just practical guidance that gets you working with Nmap confidently.
Complete Nmap Command Cheat Sheet by Scenario
1.Target Specification Techniques
Nmap’s flexibility in defining scan targets is one of its most powerful features. Here are several ways you can specify which hosts or networks to scan, tailored to your needs.
| Method | Description | Example |
|---|---|---|
| Single IP | Scan a single host. | nmap 192.168.1.1 |
| Multiple IPs | Scan specific hosts by providing their IPs. | nmap 192.168.1.1 192.168.1.2 |
| IP Range | Scan a range of IP addresses. | nmap 192.168.1.1-10 |
| CIDR Notation | Scan an entire subnet using CIDR notation. | nmap 192.168.1.0/24 |
| Hostname | Scan using a domain or hostname. | nmap example.com |
| From File | Scan targets listed in a file. | nmap -iL targets.txt |
| Random Targets | Scan a random selection of hosts. | nmap -iR 10 |
| Excluding Targets | Skip specific hosts during a scan. | nmap 192.168.1.0/24 --exclude 192.168.1.5 |
| Excluding From File | Skip hosts listed in a file. | nmap 192.168.1.0/24 --excludefile exclude.txt |
Pro Tip: Organizing Target Scans
When scanning large networks, it’s good practice to organize your targets logically. This allows you to efficiently scan different segments or types of devices by using separate files for each group.
| Method | Description | Example |
|---|---|---|
| Web Server Scan | Scan all web servers by specifying a file containing their IP addresses. |
nmap -iL webservers.txt -p 80,443 -oA web_scan |
| Database Server Scan | Scan all database servers by specifying a file containing their IP addresses. |
nmap -iL dbservers.txt -p 1433,3306,5432 -oA db_scan |
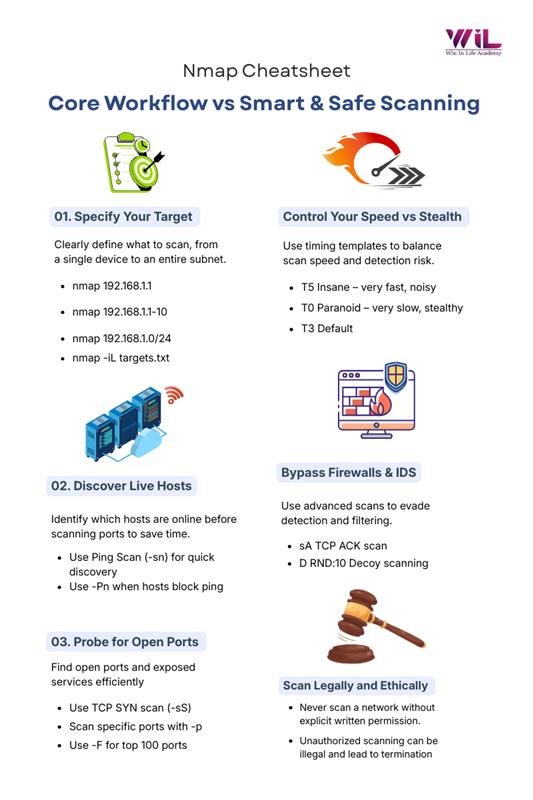
2.Port Scanning Options
Port scanning is one of Nmap’s core features, and it offers a variety of scanning techniques to identify open ports and services on a target. Below is a breakdown of the most common port scanning options:
| Command | Description | Example | When to Use |
|---|---|---|---|
| -sS | TCP SYN scan (default) | nmap -sS 192.168.1.1 | For general-purpose scanning; stealthier than a full TCP connect scan. |
| -sT | TCP connect scan | nmap -sT 192.168.1.1 | When raw packet privileges are not available. |
| -sU | UDP scan | nmap -sU 192.168.1.1 | To detect UDP services such as DNS, SNMP, and other UDP-based services. |
| -sA | TCP ACK scan | nmap -sA 192.168.1.1 | To map firewall rulesets and determine whether ports are filtered. |
3.Port Selection Options
Control the specific ports Nmap scans with these options to focus on relevant services:
| Command | Description | Example | When to Use |
|---|---|---|---|
| Default | Scan top 1000 ports | nmap 192.168.1.1 | Quick scans of common services on a target. |
| -p 22 | Scan port 22 only | nmap -p 22 192.168.1.1 | When you need to check a specific service such as SSH. |
| -p 22-100 | Scan a range of ports | nmap -p 22-100 192.168.1.1 | Useful when focusing on a specific port range. |
| -p- | Scan all ports (1–65535) | nmap -p- 192.168.1.1 | Thorough scans when time allows full enumeration. |
| -p http,https | Scan by service name | nmap -p http,https 192.168.1.1 | When you know which services (HTTP/HTTPS) to check. |
| -p T:22,U:53 | Specify TCP and UDP ports | nmap -p T:22,U:53 192.168.1.1 | For mixed protocol scanning such as SSH (TCP) and DNS (UDP). |
| –top-ports 100 | Scan top 100 ports | nmap --top-ports 100 192.168.1.1 | Quick overview of the most commonly used ports. |
| -F | Fast scan (top 100 ports) | nmap -F 192.168.1.1 | Fast reconnaissance when speed is more important than depth. |
4.Host Discovery Techniques
Before performing detailed port scanning, identifying which hosts are online is crucial. A 2023 study on network scanning efficiency found that conducting proper host discovery could reduce overall scan time by up to 70% on large networks.
| Command | Description | Example | Best For |
|---|---|---|---|
| -sn | Ping scan (no port scan) | nmap -sn 192.168.1.0/24 | Quick host discovery on friendly networks. |
| -Pn | Skip host discovery | nmap -Pn 192.168.1.1 | Scanning hosts that block ICMP. |
| -PS22,80 | TCP SYN ping on specified ports | nmap -PS22,80 192.168.1.0/24 | Networks that block standard ICMP pings. |
| -PA22,80 | TCP ACK ping on specified ports | nmap -PA22,80 192.168.1.0/24 | Bypassing stateful firewalls. |
| -PU53 | UDP ping on port 53 | nmap -PU53 192.168.1.0/24 | Networks with active UDP services. |
| -PE | ICMP echo request | nmap -PE 192.168.1.0/24 | Standard ping sweep. |
| -PP | ICMP timestamp request | nmap -PP 192.168.1.0/24 | When ICMP echo requests are blocked. |
| -PM | ICMP address mask request | nmap -PM 192.168.1.0/24 | Alternative when echo requests are blocked. |
| -PR | ARP scan (local network) | nmap -PR 192.168.1.0/24 | Fast and reliable scanning on local networks. |
| -n | No DNS resolution | nmap -n 192.168.1.0/24 | Speeding up scans when DNS lookups are unnecessary. |
| -R | Force DNS resolution | nmap -R 192.168.1.0/24 | Resolving hostnames for all scanned IP addresses. |
AI Foundation
Build practical skills to analyze, interpret, and visualize data generated from real-world systems and operations. Learn how to work with datasets, identify patterns, create dashboards, and support data-driven decision-making across technology and business domains.
5.Host Discovery Strategy
Your approach to host discovery should be tailored based on the network environment:
- Local Network: For maximum efficiency, use ARP scanning.
nmap -PR -sn 192.168.1.0/24
- Remote Network with Firewall: Use a combination of multiple ping techniques to bypass firewalls.
nmap -PS22,80,443 -PA3389 -PU161 -sn 10.0.0.0/24
- Unknown Network: Employ a comprehensive scanning strategy to detect active hosts.
nmap -PE -PP -PS21,22,23,25,80,443,3389 -PA80,443 -sn 172.16.0.0/24
6.Timing and Performance Optimization
Nmap provides timing templates that allow you to control the scan speed and level of aggressiveness. According to Nmap’s performance metrics, selecting the appropriate timing template can drastically reduce scan times, potentially turning a process that takes hours into one that takes just minutes.
| Command | Description | Example | When to Use |
|---|---|---|---|
| -T0 | Paranoid (very slow) | nmap -T0 192.168.1.1 | Use for IDS evasion and minimal impact on the network. |
| -T1 | Sneaky (slow) | nmap -T1 192.168.1.1 | Ideal for IDS evasion while maintaining a low profile. |
| -T2 | Polite (slower than default) | nmap -T2 192.168.1.1 | When minimal bandwidth usage is required. |
| -T3 | Normal (default) | nmap -T3 192.168.1.1 | Standard, balanced scanning approach. |
| -T4 | Aggressive (faster) | nmap -T4 192.168.1.1 | Best for fast, reliable networks and modern systems. |
| -T5 | Insane (very fast) | nmap -T5 192.168.1.1 | Suitable for high-bandwidth environments with some accuracy trade-offs. |
7.Fine-Tuning Scan Performance
For greater control over your scan parameters, consider adjusting the following options:
| Command | Description | Example | Impact |
|---|---|---|---|
| –min-rate=X | Set a minimum packet send rate | nmap --min-rate=100 192.168.1.1 | Ensures the scan maintains a minimum execution speed. |
| –max-rate=X | Limit the maximum packet send rate | nmap --max-rate=50 192.168.1.1 | Restricts bandwidth usage during scanning. |
| –min-parallelism=X | Specify the minimum number of parallel probes | nmap --min-parallelism=10 192.168.1.1 | Increases scan concurrency and speed. |
| –max-parallelism=X | Limit the maximum number of parallel probes | nmap --max-parallelism=10 192.168.1.1 | Reduces concurrency to minimize network impact. |
| –min-hostgroup=X | Scan a minimum number of hosts in parallel | nmap --min-hostgroup=50 192.168.1.0/24 | Improves efficiency when scanning large target sets. |
| –max-hostgroup=X | Limit the number of hosts scanned in parallel | nmap --max-hostgroup=50 192.168.1.0/24 | Controls memory usage and system load. |
| –host-timeout=X | Set a timeout for slow or unresponsive hosts | nmap --host-timeout=30m 192.168.1.0/24 | Prevents scans from stalling on slow hosts. |
| –scan-delay=X | Introduce a delay between probes | nmap --scan-delay=1s 192.168.1.1 | Helps evade rate-limiting and IDS defenses. |
| –max-retries=X | Set a limit on retry attempts | nmap --max-retries=2 192.168.1.0/24 | Speeds up scans by reducing repeated probes. |
Common Pitfalls in Nmap Scanning and How to Correct Them
1. Failing to Specify the Correct Target
- Issue: Scanning without clearly defining the target(s).
- Solution: Always ensure you specify the correct IP addresses or ranges to avoid accidental scans of the local machine or incomplete scans.
- Example: Instead of using nmap, always use a specific target like nmap 192.168.1.0/24.
2. Missing Service Version Detection
- Issue: Not using the -sV option to detect service versions.
- Solution: To gather more detailed information about services running on open ports, include the -sV flag in your command.
- Example: Use nmap -sV <target> to get service versions.
3. Running Scans Without Sufficient Privileges
- Issue: Some scan types (like SYN scan) require administrative privileges to execute.
- Solution: Run Nmap with elevated privileges (e.g., sudo on Linux/macOS) to access advanced scan options.
- Example: Use sudo nmap -sS <target> for a SYN scan.
4. Overlooking Host Discovery
- Issue: Not accounting for hosts that block ICMP requests.
- Solution: Use the -Pn option to disable host discovery and ensure all hosts are scanned, even those that do not respond to pings.
- Example: nmap -Pn <target>
5. Using Default Timing Template
- Issue: Relying on Nmap’s default timing, which may not suit your environment.
- Solution: Adjust the timing template to either speed up scans or reduce detection chances, depending on your needs.
- Example: Use -T4 for faster scans or -T0 for stealthier ones.
6. Selecting the Wrong Scan Type
- Issue: Using an inappropriate scan type for your objective (e.g., missing a UDP scan or TCP SYN scan).
- Solution: Choose the scan type that best fits your goal, such as -sS for SYN scans or -sU for scanning UDP services.
- Example: nmap -sS <target> for a stealthy scan.
7. Not Using Proper Output Formats
- Issue: Sticking with the default output format, which can be difficult to parse.
- Solution: Use alternative output formats like XML or greppable formats for easier analysis and integration with other tools.
- Example: nmap -oX scan_results.xml <target>
8. Scanning All Ports Without Necessity
- Issue: Scanning all 65535 ports when only a few are relevant.
- Solution: Limit the scan to specific ports or port ranges to save time and focus on the critical services.
- Example: nmap -p 22,80,443 <target> to scan only key ports.
9. Ignoring Evasion Techniques
- Issue: Running scans that are easily detected by firewalls or IDS/IPS systems.
- Solution: Implement evasion techniques, such as delaying probes or using decoys, to bypass security defenses.
- Example: nmap -D RND:10 <target> for decoy scanning.
10. Misinterpreting Scan Results
- Issue: Failing to properly analyze and understand the scan output.
- Solution: Take time to review the results thoroughly, using additional options like -O for OS detection and –script for vulnerability scanning.
- Example: Use nmap -O <target> for OS detection or nmap –script=vuln <target> to identify vulnerabilities.
Online Certifications
Build hands-on cybersecurity skills to protect digital systems, networks, and data from real-world cyber threats. Learn how security operations, access control, risk management, and incident response work in modern enterprise and cloud environments.
Nmap in Complex Scenarios: Advanced Techniques
While Nmap is a powerful tool for network scanning, it also has the capability to handle complex and specialized situations that may not be covered in basic usage. These advanced scenarios often arise in more sophisticated or unconventional network environments. Below are some examples and explanations:
1. Scanning Through Firewalls and IDS/IPS
- Scenario: Firewalls and Intrusion Detection/Prevention Systems (IDS/IPS) often block or detect Nmap scans, especially if the scan is too aggressive or resembles attack patterns.
- Solution: Use more subtle scan types like -sS (SYN scan) or -PA (TCP ACK scan) to bypass firewalls. You can also use -T1 for slow scans and -D for decoy scanning to reduce detection.
- Example: nmap -sS -D RND:10 -T2 192.168.1.1
2. Scanning Over a VPN or Proxy
- Scenario: When scanning over a VPN or through a proxy, Nmap scans may be unreliable or slower due to routing limitations, or the VPN may block certain types of traffic.
- Solution: Ensure the VPN allows for the type of scanning you want to perform. Use the -S flag to spoof the source IP if necessary and the –proxy option to route traffic through a proxy.
- Example: nmap –proxy socks5://proxy.example.com:1080 192.168.1.1
3. Scanning Behind NAT (Network Address Translation)
- Scenario: When scanning a target behind a NAT (e.g., in a home or enterprise network), Nmap may fail to reach the actual machine due to the translation of IP addresses.
- Solution: Use port forwarding on the NAT device or scan the NAT gateway and forward traffic. Additionally, scanning with -sT (TCP connect) is often more effective behind NAT than SYN scanning.
- Example: nmap -sT 192.168.1.1
4. IPv6 Scanning
- Scenario: Scanning IPv6 addresses is different from IPv4, given the vastly larger address space and different network configurations. It may also require specific tools or modifications.
- Solution: Use the -6 flag in Nmap to enable IPv6 scanning. Be aware that some systems might not respond to IPv6 scan probes as expected.
- Example: nmap -6 -sS 2001:db8::1
5. OS Detection and Fingerprinting
- Scenario: Accurately detecting the operating system (OS) of a target machine is essential for penetration testing and vulnerability assessment. However, some devices and firewalls block OS fingerprinting attempts.
- Solution: Use the -O option for OS detection but be aware that firewalls or certain devices may block or distort these probes. You may need to employ evasion techniques to avoid detection.
- Example: nmap -O 192.168.1.1
What Nmap Doesn’t Tell You: Essential Tips for Better Scans
When you run an Nmap scan, it’s easy to misinterpret the results, especially when Nmap doesn’t show everything you expect. Here’s an analysis of some of the “silent” parts of Nmap and what they really mean for your next move:
- No Response = Filtered/Stealthed
- What it means: No response could indicate a filtered or stealthed port.
- Next move: Use -Pn to skip host discovery or try SYN scans (-sS).
- Closed vs. Filtered Ports
- What it means: “Closed” is rejected; “filtered” is blocked by a firewall.
- Next move: Probe filtered ports with -PA or -PS.
- Version Detection Fails
- What it means: Services might obfuscate responses or firewalls to block detection.
- Next move: Use Nmap scripts (–script) for more detailed detection.
- Host Down = Likely Firewall
- What it means: “Host down” usually means ICMP is blocked.
- Next move: Use -Pn to bypass host discovery.
- Experience vs. Beginners
- What it means: Experienced users know how to handle ambiguous results.
- Next move: Beginners should start with basic scans and progress to advanced techniques.
Before Scanning: Know Your Legal Boundaries
- Unauthorized Scanning = Fireable Offense:
Scanning your company’s network without authorization can lead to termination. Always secure permission beforehand.
- Scanning Your ISP or Neighbor’s Wi-Fi = Illegal:
Scanning your ISP’s infrastructure or your neighbor’s Wi-Fi without consent is illegal in most countries.
What You CAN Scan:
- Your Own VMs or Lab Environments: No issues here.
- HackTheBox/TryHackMe: Legal and secure environments designed for practice.
- Employer Networks (with Written Permission): Always obtain written consent.
Authorization Template:
Authorization to Perform Network Scan
I, [Your Name], request permission to conduct a network scan on [Company Name]’s infrastructure for [specific purpose]. This will be done on [network/servers], per the company’s security policies.
Signed,
[Your Name]
[Date]
Conclusion
Mastering Nmap in complex and edge-case scenarios is an essential skill for anyone aspiring to succeed in cybersecurity. Whether you’re conducting scans through firewalls, working with NAT configurations, or performing OS detection on challenging networks, gaining expertise in advanced scanning techniques will enhance your ability to identify vulnerabilities and secure systems effectively.
At Win in Life Academy, we offer a comprehensive Cybersecurity Course tailored to provide you with the knowledge and hands-on experience needed to handle these advanced situations. With a focus on industry-standard tools like Nmap, our course equips you to excel in network scanning, vulnerability assessments, and proactive threat prevention
Frequently Asked Questions (FAQs)
1. What is Nmap used for cybersecurity?
Nmap is used for network discovery, port scanning, service detection, and vulnerability assessment, making it a core tool in penetration testing and security auditing.
2. Is this Nmap cheatsheet suitable for beginners?
Yes. This nmap cheatsheet includes basic Nmap commands and practical examples, helping beginners understand scanning concepts before moving to advanced techniques.
3. What are the most important basic Nmap commands to learn first?
Beginners should start with nmap <target>, -sS, -p, -sn, and -sV to understand host discovery and port scanning.
4. Can Nmap perform vulnerability scanning?
Yes. Nmap supports nmap vulnerability scanning using NSE scripts such as –script=vuln, but it is usually combined with other security tools.
5. Is using Nmap legal?
Nmap is legal, but scanning networks without permission is illegal. Always scan systems you own or have written authorization to test.