


As web applications become central to our daily lives, they’ve also become major targets for cyberattacks. Securing them is more critical than ever, and that’s where Burp Suite comes in. Developed by PortSwigger, Burp Suite is a trusted platform for web application security testing, widely used in penetration testing and ethical hacking. Today, it stands as one of the most widely adopted tools in the industry, with over 88,000 customers across 165 countries, highlighting its global reach and credibility in the cybersecurity world.
Think of Burp Suite as a sophisticated toolkit that helps security professionals assess the strength of a website’s defenses, much like testing whether a door lock is secure. It captures and analyzes all traffic exchanged between your browser and the website, allowing you to modify requests and observe how the server responds. This enables you to identify common vulnerabilities like SQL Injection, XSS, and authentication flaws, ensuring web applications are shielded from potential threats.
In this guide, we’ll walk through how to implement and use Burp Suite effectively, so you can take full advantage of its powerful testing capabilities. Whether you’re just starting out in web security or already have experience in penetration testing, this guide will help you understand how to set up Burp Suite, use its core tools, and apply it to real-world security testing with confidence.
What is Burp Suite Software?
Burp Suite is an integrated testing environment that gives security professionals a deeper look at how web applications behave behind the scenes. Instead of examining only what happens on the screen, it allows you to analyze how requests are processed internally, how different components interact, and how an application reacts when its inputs or flows change. This makes Burp Suite especially valuable for understanding the true behavior of a web application, how it handles data, manages states, and responds under varying conditions.
What makes Burp Suite particularly effective is its modular design. Each tool within the suite serves a specific purpose, but all of them work together in a single, unified workspace. This lets testers move seamlessly between automated scanning and precise manual testing, making it suitable for everything from quick checks to advanced, in-depth assessments. Because of this flexibility, Burp Suite is relied upon by penetration testers, bug bounty hunters, security teams, and learners who want to understand how modern applications function internally and how resilient they are when tested from multiple angles.
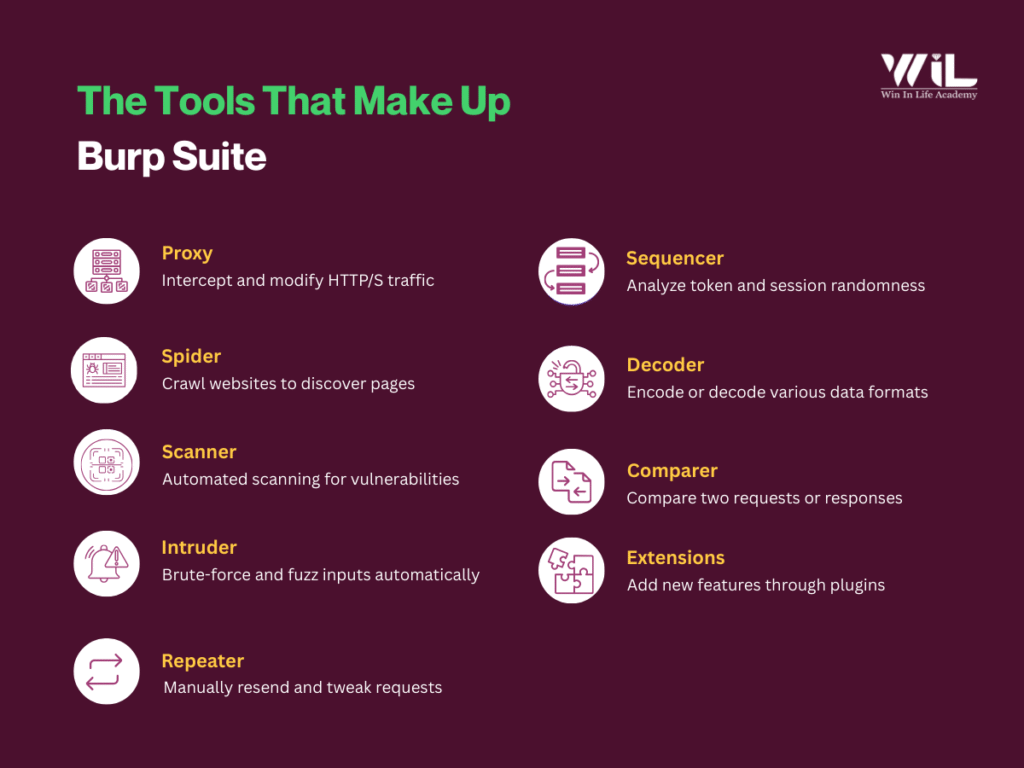
The Tools That Make Up Burp Suite
Burp Suite includes several core components that work together to help security professionals identify vulnerabilities. Here’s a breakdown of the main components:
1. Proxy
The Proxy in Burp Suite is the most essential tool. It acts as a “man-in-the-middle” between your browser and the website you’re testing. When you configure your browser to route traffic through Burp Suite, it intercepts all HTTP/S requests and responses between your browser and the website.
- Key Functions:
- Intercept and analyze web traffic in real-time.
- Modify requests (e.g., change parameters, add headers) before they are sent to the server.
- Modify responses coming from the server before they are sent to your browser.
This allows you to test how a website responds to various inputs, like malicious code or altered data.
2. Spider
The Spider tool automatically crawls into a web application to discover all its pages and resources. It follows links within the website, submits forms, and identifies every possible entry point.
- Key Functions:
- Automatically maps out the entire structure of a website.
- Discovers all available pages, forms, and links.
- Helps you identify which parts of the application are exposed and need testing.
The Spider is crucial for gathering information about a site before running tests on potential vulnerabilities.
3. Scanner
The Scanner tool scans a web application for common vulnerabilities, such as SQL Injection, Cross-Site Scripting (XSS), and others. It can perform both active and passive scanning.
- Key Functions:
- Active scanning: Sends test payloads to actively probe for vulnerabilities (e.g., injecting SQL queries to test for SQL Injection).
- Passive scanning: Analyzes traffic without interacting directly with the server, identifying issues like missing security headers or improper SSL configurations.
The Scanner automates the process of vulnerability testing, making it faster and easier to detect common issues.
4. Intruder
The intruder is an automated attack tool used for performing tasks like brute-forcing, fuzzing, and parameter manipulation. It sends a variety of predefined or custom payloads (data) to test how the web application handles different inputs.
- Key Functions:
- Performs brute-force attacks on login forms to guess passwords or usernames.
- Fuzzing: Sends random or unexpected data to input fields to find vulnerabilities.
- Tests the robustness of authentication mechanisms, input fields, or other areas that require data entry.
Intruder is highly customizable, allowing you to craft your own payloads and attack strategies for deep testing.
5. Repeater
Repeater is a manual tool that allows you to modify and resend individual HTTP/S requests to a web server. You can capture a request using the Proxy, modify it, and resend it to observe how the server responds.
- Key Functions:
- Modify captured requests and experiment with different payloads or inputs.
- Manually test vulnerabilities discovered through other Burp Suite tools.
- Observe the server’s behavior in real time when you change parts of the request (e.g., parameters, headers).
Repeater is perfect for detailed, manual testing when you need to fine-tune specific aspects of web application security.
6. Sequencer
The Sequencer analyzes the randomness of session tokens, cookies, or other dynamic data used in web applications. It helps assess if these tokens are predictable or weak, which can lead to security risks.
- Key Functions:
- Tests whether session tokens, passwords, or other dynamic values are predictable.
- Measures the randomness of tokens and checks for weak or guessable patterns.
- Identify security risks related to session fixation or token-based attacks.
This is important for identifying weaknesses in authentication or session management.
7. Decoder
The Decoder tool helps with encoding and decoding data in different formats, such as Base64, URL encoding, or HTML encoding. This is useful when testing encrypted or obfuscated data in requests or responses.
- Key Functions:
- Decode or encode data between formats (e.g., Base64, URL encoding).
- Reverse obfuscation to understand hidden data in HTTP requests or responses.
- Modify encoded data to explore how the server handles it.
Decoders are useful for interpreting data that might otherwise be difficult to read or modify.
8. Comparer
Comparer allows you to compare two pieces of data (such as requests, responses, or headers) and highlights the differences between them. This can help identify changes in server behavior or pinpoint subtle differences that might indicate vulnerabilities.
- Key Functions:
- Compare HTTP requests, responses, or other pieces of data.
- Detect subtle changes in server behavior that may indicate security flaws.
- Helps track differences when modifying requests or performing repeated tests.
Comparer is particularly useful when examining how a server responds to different inputs or requests.
9. Extensions
Burp Suite supports extensions, which are additional modules that can enhance the tool’s functionality. You can install extensions from Burp’s built-in BApp Store or create your own to add custom features.
- Key Functions:
- Extend Burp Suite’s functionality with third-party tools or custom scripts.
- Integrate with other security tools or automation systems.
- Automate repetitive tasks or add new capabilities for specialized testing.
Extensions are highly customizable and allow Burp Suite to grow with your specific security testing needs.
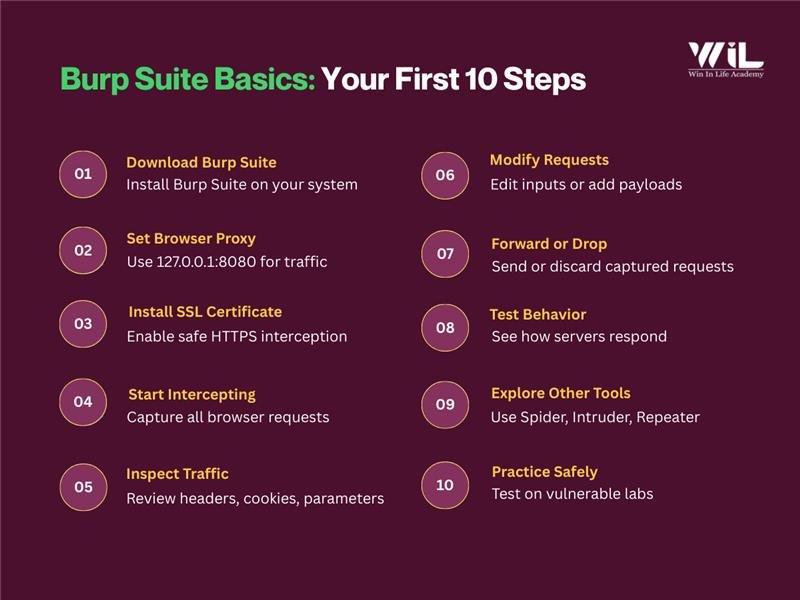
Step-by-step Process to Get Started with Burp Suite
- Download and Install Burp Suite
Visit the official Burp Suite website and download either the Community or Professional edition. Complete the installation as instructed.
- Configure Your Browser to Route Traffic Through Burp
Set your browser’s proxy settings to 127.0.0.1:8080, which is Burp Suite’s default address. This ensures all your traffic flows through Burp instead of directly to the website.
- Install Burp’s SSL Certificate (For HTTPS Websites)
Since most sites use HTTPS, install Burp Suite’s SSL certificate in your browser. This removes security warnings and allows Burp to decrypt encrypted traffic safely.
- Start Intercepting Traffic
With the setup done every HTTP/S request and response from your browser will now pass through Burp’s Proxy. Burp captures this traffic before it reaches the server and intercepts responses coming back to you.
- Inspect Requests and Responses
You can view all intercepted data inside the Proxy tab including headers, cookies, parameters, and form values. This helps you understand how the web application communicates.
- Modify Requests Before Sending
Burp Suite lets you edit captured requests before forwarding them. You can:
- Change parameters or inputs
- Insert test payloads (e.g., for SQL Injection or XSS)
- Alter cookies or headers
This is essential for testing how the application handles unexpected or malicious data.
- Forward or Drop Requests
After reviewing or modifying a request, you can choose to forward it to the server or drop it entirely. This gives you full control over how and when the server receives traffic.
- Test Application Behavior in Real Time
By intercepting and modifying traffic, you immediately see how the server responds. This helps uncover vulnerabilities like SQL Injection, Cross-Site Scripting (XSS), and authentication issues.
- Explore Other Burp Suite Tools
Once you’re familiar with the Proxy, you can begin using additional tools:
- Spider to map the application
- Scanner (Pro) for automated vulnerability checks
- Intruder for fuzzing and brute-force testing
- Repeater for manually tweaking and replaying requests
- Practice on Safe, Vulnerable Web Applications
Strengthen your skills by testing intentionally vulnerable websites. This helps you quickly recognize common patterns and weaknesses.
Beginner Checklist for Using Burp Suite
- Test only in authorized environments
Make sure you have permission before testing any application.
- Turn Intercept ON only when needed
This keeps your browser from hanging and avoids unwanted request blocking.
- Use safe labs to practice
Start with intentionally vulnerable platforms like PortSwigger Labs or DVWA to build confidence.
- Stay organized
Label requests, take simple notes, and keep your testing structured to avoid confusion.
- Avoid rushing into attacks
Explore and understand the application first before performing active tests.
Additional Insight
Deep Dive: How Burp Suite Intercepts HTTPS Traffic
Most websites today use HTTPS, which encrypts data to keep it secure. Burp Suite needs to read this encrypted traffic for testing, so it uses a safe “man-in-the-middle” approach.
When you install Burp’s SSL certificate, your browser begins to trust Burp Suite as if it were the website. This allows Burp to decrypt the HTTPS traffic, show you the requests and responses, and let you modify them during testing. After inspection, Burp re-encrypts the data and sends it to the server, keeping the connection secure throughout.
In simple terms, Burp Suite temporarily sits between your browser and the website, so you can analyze encrypted traffic and uncover hidden security issues.
Burp Suite Community vs Professional: Which One to Choose?
Community Edition
- Free and basic, offering tools like Proxy, Repeater, Decoder, and Sequencer.
- Perfect for beginners and manual security testing.
- Lacks advanced features like automated scanning.
Professional Edition
- Paid version with advanced features, including automated vulnerability scanning, full Intruder tool, and the ability to save project files.
- Offers additional extensions, enhanced workflows, and more powerful testing tools.
- Tailored for professional penetration testers, bug bounty hunters, and security teams.
The Community Edition is ideal for learning and basic testing, while the Professional Edition provides automation and advanced features for professional-level security testing.
Troubleshooting Common Setup Issues
- Proxy not capturing:
Check browser proxy settings → 127.0.0.1:8080
Make sure Intercept is ON when required.
- HTTPS errors:
Install Burp’s SSL certificate → restart browser.
- Port conflict:
Change Burp’s Proxy Listener to another port (e.g., 8081).
- Strange or empty responses:
Disable ad-blockers/privacy extensions → clear cache.
- Burp feels slow:
Turn Intercept OFF → close unnecessary Burp tabs.
Conclusion
Getting started with Burp Suite is a crucial step in mastering web application security testing. By configuring the tool and using features like Proxy, Spider, Scanner, and Intruder, you’ll quickly begin identifying vulnerabilities such as SQL Injection and XSS. To deepen your understanding and practical skills, consider enrolling in the Cyber Security Course by Win in Life Academy. This course covers key areas like ethical hacking, network defense, and hands-on security testing with tools like Burp Suite, providing you with the knowledge and expertise needed to address web application vulnerabilities. With continued practice, Burp Suite and the training from Win in Life Academy will help you advance your skills in web security and ethical hacking.